How to Create a Table of Contents in Word
A table of contents is a crucial component of longer documents where easy navigation and reference are crucial to the reader. It also provides structure and clarity which improves usability for both authors and readers. Follow these steps to create a table of contents in Word:
Step 1
Ensure that your document is properly formatted with headings. Use the built-in heading styles such as “Heading 1,” “Heading 2,” etc., to structure your document. These styles can be found in the “Styles” group on the “Home” tab in Word. Apply these styles to your headings to help Word identify the structure of your document. To learn more about Styles in Word, click here.
Step 2
Position the cursor where you want to insert the table of contents. Typically, this is at the beginning of the document, but you can place it anywhere you like.
Step 3
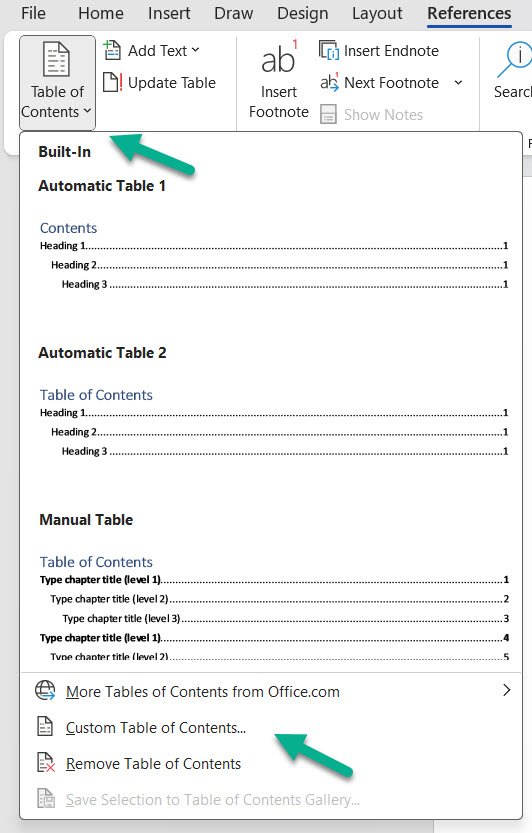
To insert a table of contents, go to the “References” tab at the top of the Word window. In the “Table of Contents” group, you’ll find different styles for tables of contents. You can choose one of the built-in options, or you can create a custom one by selecting “Custom Table of Contents.”

Step 4
If you select a built-in style, Word will insert the table of contents using that style. If you choose “Custom Table of Contents,” you can configure various options, including the number of levels to include, the tab leader, and the formatting of the table.

Step 5
Once you’ve inserted the table of contents, it may not be up to date with your document’s current structure. To update it, right-click on the table of contents and select “Update Field.” You can choose to update the entire table or just the page numbers.

Your table of contents should now be generated and display the headings and corresponding page numbers from your document. If you make changes to the headings or structure of your document, remember to update the table of contents to reflect these changes.
